This chapter is an introductory tutorial for new users of Metawidget. Before you begin, you need to download the binary distribution from http://metawidget.org/download.php.
If you are using a Java-based framework (including Android, and Java-based web frameworks such as GWT or Java Server Faces) you should follow Section 1.1, “Part 1 (Java version) - The First Metawidget Application”. If you are using a pure JavaScript-based framework (such as AngularJS or JQuery Mobile) you should follow Section 1.2, “Part 1 (JavaScript version) - The First Metawidget Application”.
Part 1 starts with a simple Swing application and develops it in easy to understand steps. Metawidget supports many Java-based UI frameworks, not just Swing, but we start with Swing because it ships with Java SE and requires minimal setup.
This tutorial should take around 20 minutes. We recommend you use your preferred Java development environment. If you use an Integrated Development Environment (IDE), you will need to start a new Java project and add metawidget-all.jar to it. Otherwise, you just need to ensure metawidget-all.jar is on your CLASSPATH.
Metawidget is an Object/User Interface Mapping tool (OIM), so first we need an object to map from - the O in OIM. Create a class in your project called Person with the following code:
package com.myapp;

public class Person {
	private String	mName;
	private int		mAge;
	private boolean	mRetired;

	public String getName() { return mName; }
	public void setName( String name ) { mName = name; }

	public int getAge() { return mAge; }
	public void setAge( int age ) { mAge = age; }

	public boolean isRetired() { return mRetired; }
	public void setRetired( boolean retired ) { mRetired = retired; }
}
Next we need a User Interface framework - the I in OIM. Create a class in your project called Main with the following code:
package com.myapp;

import javax.swing.*;
import org.metawidget.swing.*;

public class Main {

	public static void main( String[] args ) {
		Person person = new Person();

		SwingMetawidget metawidget = new SwingMetawidget();
		metawidget.setToInspect( person );

		JFrame frame = new JFrame( "Metawidget Tutorial" );
		frame.setDefaultCloseOperation( JFrame.EXIT_ON_CLOSE );
		frame.getContentPane().add( metawidget );
		frame.setSize( 400, 250 );
		frame.setVisible( true );
	}
}
![[Tip]](../shared/images/admons/html/tip.png) | Note |
|---|---|
| Many IDEs include visual UI builders for dragging and dropping widgets. Metawidget integrates with these tools and Metawidgets can be dragged and dropped like any other. As we shall see, however, Metawidget widgets automatically fill themselves with child widgets at runtime, saving significant development time. |
If you're using an IDE, such as NetBeans, your project should look something like pictured in Figure 1.1.
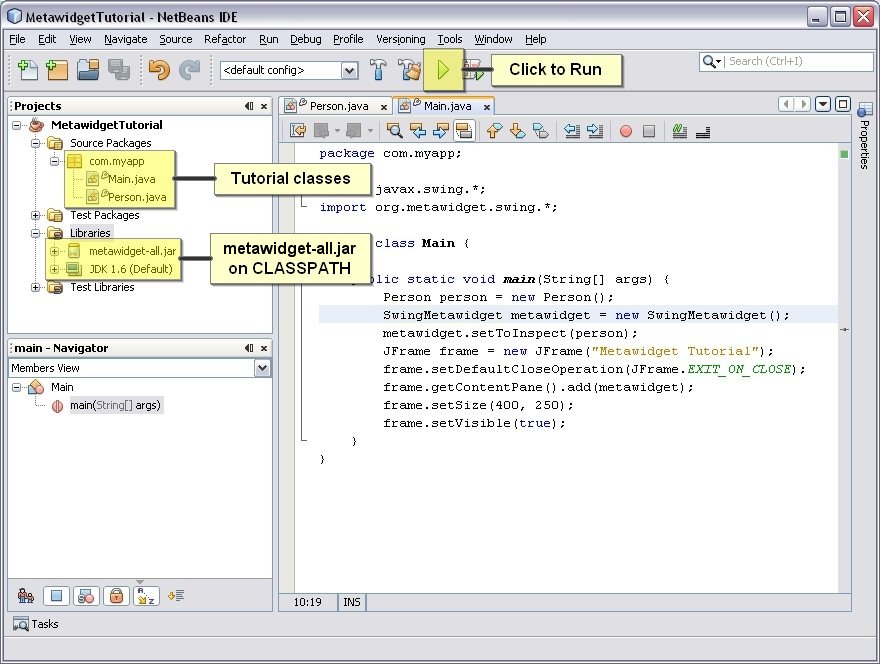
Run the code. You should see the screen in Figure 1.2.

The SwingMetawidget has automatically populated itself with child widgets at runtime. It has chosen JSpinner, JTextField and JCheckBox widgets based on the types of the properties of the Person class. This is the First Goal Of Metawidget:
![[Important]](../shared/images/admons/html/important.png) | First Goal Of Metawidget |
|---|---|
| Metawidget creates UI widgets by inspecting existing architectures |
By default, SwingMetawidget has laid out the JComponents using java.awt.GridBagLayout. Try resizing the window, and the JComponents will resize with it. If you've ever tried using java.awt.GridBagLayout yourself, either through code or a visual UI builder, you'll know how fiddly it can be. Having Metawidget do it for you is a real time-saver.
Clearly this is not a complete UI. There are no Save or Cancel buttons, for example, and the JComponents appear uncomfortably tight to the left, top and right edges of the JFrame. This is explained by the Second Goal Of Metawidget:
| Second Goal Of Metawidget |
|---|---|
| Metawidget does not try to 'own' the entire UI - it focuses on creating native sub-widgets for slotting into existing UIs |
You slot Metawidget alongside your standard UI components, often combining several Metawidgets on the same screen. We'll see how this works later.
Currently the name, age and retired properties are arranged alphabetically in the UI - their order does not match the way they are defined in the Person class. This is because property ordering information is not retained within Java class files (as per the Java Language Specification).
To correct this, Metawidget needs to gather additional information. There are several ways to do this (i.e. you don't have to use annotations), but the simplest for now is to use the built-in Metawidget annotation @UiComesAfter.
Annotate the Person class as shown below (lines to add are highlighted):
package com.myapp; import org.metawidget.inspector.annotation.*; public class Person { private String mName; private int mAge; private boolean mRetired; public String getName() { return mName; } public void setName( String name ) { mName = name; } @UiComesAfter( "name" )public int getAge() { return mAge; } public void setAge( int age ) { mAge = age; } @UiComesAfter( "age" ) public boolean isRetired() { return mRetired; } public void setRetired( boolean retired ) { mRetired = retired; } }
|
Annotations can also be applied to the private fields, such as mAge, but that requires a little extra configuration. |
Run the code again. This time the properties appear in the correct order:

Introducing new annotations to improve the UI is not really in the spirit of the First Goal Of Metawidget. We'd much rather improve it by gathering information from existing sources. To demonstrate, we'll need an external source of metadata. Create a file called metawidget-metadata.xml in the same folder as your Main class:
<inspection-result xmlns="http://metawidget.org/inspection-result"
	xmlns:xsi="http://www.w3.org/2001/XMLSchema-instance"
	version="1.0"
	xsi:schemaLocation="http://metawidget.org/inspection-result
		http://metawidget.org/xsd/inspection-result-1.0.xsd">

	<entity type="com.myapp.Person">
		<property name="name"/>
		<property name="age"/>
		<property name="retired"/>
	</entity>

</inspection-result>
To recognise the XML file, Metawidget needs to use a different Inspector. Metawidget comes with multiple Inspectors, each targeting different sources of information. Change the Main class to use an XmlInspector (lines to add are highlighted):
package com.myapp;

import javax.swing.*;
import org.metawidget.inspector.xml.*;
import org.metawidget.swing.*;

public class Main {

	public static void main( String[] args ) {
		Person person = new Person();

		SwingMetawidget metawidget = new SwingMetawidget();
		XmlInspectorConfig config = new XmlInspectorConfig();
		config.setInputStream( Main.class.getResourceAsStream( "metawidget-metadata.xml" ));
		metawidget.setInspector( new XmlInspector( config ) );
		metawidget.setToInspect( person );

		JFrame frame = new JFrame( "Metawidget Tutorial" );
		frame.setDefaultCloseOperation( JFrame.EXIT_ON_CLOSE );
		frame.getContentPane().add( metawidget );
		frame.setSize( 400, 250 );
		frame.setVisible( true );
	}
}
Then remove all annotations from the Person class:
package com.myapp;

public class Person {
	private String	mName;
	private int		mAge;
	private boolean	mRetired;

	public String getName() { return mName; }
	public void setName( String name ) { mName = name; }

	public int getAge() { return mAge; }
	public void setAge( int age ) { mAge = age; }

	public boolean isRetired() { return mRetired; }
	public void setRetired( boolean retired ) { mRetired = retired; }
}
Run the code again. It does not yield the correct result - the properties appear in the correct order, but the JSpinner and JCheckBox are now JTextFields! What happened?

Metawidget Inspectors are very targeted in what they inspect. XmlInspector looks for metadata from XML files - but it does not look for anything else, such as JavaBean property types. Before we explicitly specified an XmlInspector, Metawidget had been implictly using two Inspectors for us, called PropertyTypeInspector and MetawidgetAnnotationInspector.
What we need is to combine the results of PropertyTypeInspector, MetawidgetAnnotationInspector and XmlInspector before returning them to SwingMetawidget. We do this using CompositeInspector:
package com.myapp;

import javax.swing.*;
import org.metawidget.inspector.annotation.*;
import org.metawidget.inspector.composite.*;
import org.metawidget.inspector.propertytype.*;
import org.metawidget.inspector.xml.*;
import org.metawidget.swing.*;

public class Main {

	public static void main( String[] args ) {
		Person person = new Person();

		SwingMetawidget metawidget = new SwingMetawidget();
		XmlInspectorConfig config = new XmlInspectorConfig();
		config.setInputStream( Main.class.getResourceAsStream( "metawidget-metadata.xml" ));
		CompositeInspectorConfig inspectorConfig = new CompositeInspectorConfig().setInspectors(
			new XmlInspector( config ),
			new PropertyTypeInspector(),
			new MetawidgetAnnotationInspector() );
		metawidget.setInspector( new CompositeInspector( inspectorConfig ) );
		metawidget.setToInspect( person );

		JFrame frame = new JFrame( "Metawidget Tutorial" );
		frame.setDefaultCloseOperation( JFrame.EXIT_ON_CLOSE );
		frame.getContentPane().add( metawidget );
		frame.setSize( 400, 250 );
		frame.setVisible( true );
	}
}
Run the code again. This time properties appear both in the correct order and using the correct JComponent:

This idea of combining multiple Inspectors to inspect different characteristics of your existing architecture is very powerful. Metawidget comes with pre-written Inspectors for many different technologies - from JPA and Hibernate Validator annotations, to struts-config.xml configuration files, to Groovy and Scala properties. There is a lot of metadata already lurking in back-end systems - it just needs extracting. For example, JpaInspector understands this...
import javax.persistence.Column;

public class Person {
	@Column( nullable = false )
	public String getName() { ... };
}
...denotes name is a required property (could be rendered with an asterisk after it in the UI). Equally, PropertyTypeInspector understands that...
public class Person {
	private String mName;

	public String getName() {
		return mName;
	}

	// No setter
}
...signifies name is a read-only property (could be rendered as a label in the UI).
There are several ways to control the layout of the components. To demonstrate, Try adding the following properties to the Person class:
package com.myapp; import org.metawidget.inspector.annotation.*; public class Person { public enum Gender { Male, Female } private String mName; private int mAge; private boolean mRetired; private Gender mGender; private String mNotes; private String mEmployer; private String mDepartment; public String getName() { return mName; } public void setName( String name ) { mName = name; } public int getAge() { return mAge; } public void setAge( int age ) { mAge = age; } public boolean isRetired() { return mRetired; } public void setRetired( boolean retired ) { mRetired = retired; } @UiComesAfter( "retired" )
|
We'll use annotations again for brevity. But such metadata could be inspected from any source, such as an XML file. |
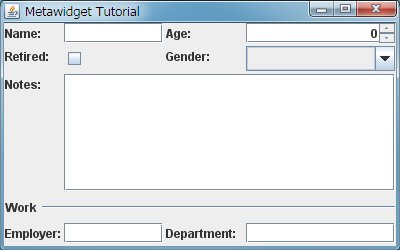
This code produces the screen in Figure 1.6. Annotations have been used to define section headings and 'large' properties (i.e. a JTextArea).

| Note |
|---|---|
| For a list of all the annotations MetawidgetAnnotationInspector recognises, see Section 4.3.7, “MetawidgetAnnotationInspector”. |
By default, SwingMetawidget lays out JComponents using org.metawidget.swing.layout.GridBagLayout. You can configure this layout, or swap it for a different layout, using SwingMetawidget.setMetawidgetLayout. Modify the code to use a GridBagLayout with 2 columns:
package com.myapp;

import javax.swing.*;
import org.metawidget.inspector.annotation.*;
import org.metawidget.inspector.composite.*;
import org.metawidget.inspector.propertytype.*;
import org.metawidget.inspector.xml.*;
import org.metawidget.swing.*;
import org.metawidget.swing.layout.*;

public class Main {

	public static void main( String[] args ) {
		Person person = new Person();

		SwingMetawidget metawidget = new SwingMetawidget();
		XmlInspectorConfig config = new XmlInspectorConfig();
		config.setInputStream( Main.class.getResourceAsStream( "metawidget-metadata.xml" ));
		CompositeInspectorConfig inspectorConfig = new CompositeInspectorConfig().setInspectors(
			new XmlInspector( config ),
			new PropertyTypeInspector(),
			new MetawidgetAnnotationInspector() );
		metawidget.setInspector( new CompositeInspector( inspectorConfig ) );
		GridBagLayoutConfig nestedLayoutConfig = new GridBagLayoutConfig().setNumberOfColumns( 2 );
		SeparatorLayoutDecoratorConfig layoutConfig = new SeparatorLayoutDecoratorConfig().setLayout(
			new org.metawidget.swing.layout.GridBagLayout( nestedLayoutConfig ));
		metawidget.setMetawidgetLayout( new SeparatorLayoutDecorator( layoutConfig ));
		metawidget.setToInspect( person );

		JFrame frame = new JFrame( "Metawidget Tutorial" );
		frame.setDefaultCloseOperation( JFrame.EXIT_ON_CLOSE );
		frame.getContentPane().add( metawidget );
		frame.setSize( 400, 250 );
		frame.setVisible( true );
	}
}
Run the code. The JComponents are now arranged across two columns:
You may have noticed the GridBagLayout is nested inside a SeparatorLayoutDecorator. This is responsible for separating widgets in different sections using JSeparators. However there are other choices for separating widgets. Modify the code to use TabbedPaneLayoutDecorator instead:
package com.myapp;

import javax.swing.*;
import org.metawidget.inspector.annotation.*;
import org.metawidget.inspector.composite.*;
import org.metawidget.inspector.propertytype.*;
import org.metawidget.inspector.xml.*;
import org.metawidget.swing.*;
import org.metawidget.swing.layout.*;

public class Main {

	public static void main( String[] args ) {
		Person person = new Person();

		SwingMetawidget metawidget = new SwingMetawidget();
		XmlInspectorConfig config = new XmlInspectorConfig();
		config.setInputStream( Main.class.getResourceAsStream( "metawidget-metadata.xml" ));
		CompositeInspectorConfig inspectorConfig = new CompositeInspectorConfig().setInspectors(
			new XmlInspector( config ),
			new PropertyTypeInspector(),
			new MetawidgetAnnotationInspector() );
		metawidget.setInspector( new CompositeInspector( inspectorConfig ) );
		GridBagLayoutConfig nestedLayoutConfig = new GridBagLayoutConfig().setNumberOfColumns( 2 );
		TabbedPaneLayoutDecoratorConfig layoutConfig = new TabbedPaneLayoutDecoratorConfig().setLayout(
			new org.metawidget.swing.layout.GridBagLayout( nestedLayoutConfig ));
		metawidget.setMetawidgetLayout( new TabbedPaneLayoutDecorator( layoutConfig ));
		metawidget.setToInspect( person );

		JFrame frame = new JFrame( "Metawidget Tutorial" );
		frame.setDefaultCloseOperation( JFrame.EXIT_ON_CLOSE );
		frame.getContentPane().add( metawidget );
		frame.setSize( 400, 250 );
		frame.setVisible( true );
	}
}
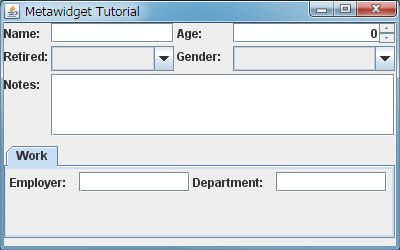
Run the code. The section heading is now a JTabbedPane:

Again, if you've ever used java.awt.GridBagLayout by hand, you'll appreciate how much easier Metawidget makes it to apply consistent layouts across all screens of your application.
There are several ways to control widget creation. One way is to drop child controls inside the SwingMetawidget. This approach works well both programmatically within code and within visual UI builders.
Modify the code to add a JComboBox to the Metawidget:
package com.myapp;

import javax.swing.*;
import org.metawidget.inspector.annotation.*;
import org.metawidget.inspector.composite.*;
import org.metawidget.inspector.propertytype.*;
import org.metawidget.inspector.xml.*;
import org.metawidget.swing.*;
import org.metawidget.swing.layout.*;

public class Main {

	public static void main( String[] args ) {
		Person person = new Person();

		SwingMetawidget metawidget = new SwingMetawidget();
		XmlInspectorConfig config = new XmlInspectorConfig();
		config.setInputStream( Main.class.getResourceAsStream( "metawidget-metadata.xml" ));
		CompositeInspectorConfig inspectorConfig = new CompositeInspectorConfig().setInspectors(
			new XmlInspector( config ),
			new PropertyTypeInspector(),
			new MetawidgetAnnotationInspector() );
		metawidget.setInspector( new CompositeInspector( inspectorConfig ) );
		GridBagLayoutConfig nestedLayoutConfig = new GridBagLayoutConfig().setNumberOfColumns( 2 );
		TabbedPaneLayoutDecoratorConfig layoutConfig = new TabbedPaneLayoutDecoratorConfig().setLayout(
			new org.metawidget.swing.layout.GridBagLayout( nestedLayoutConfig ));
		metawidget.setMetawidgetLayout( new TabbedPaneLayoutDecorator( layoutConfig ));
		metawidget.setToInspect( person );
		JComboBox combo = new JComboBox();
		combo.setName( "retired" );
		metawidget.add( combo );

		JFrame frame = new JFrame( "Metawidget Tutorial" );
		frame.setDefaultCloseOperation( JFrame.EXIT_ON_CLOSE );
		frame.getContentPane().add( metawidget );
		frame.setSize( 400, 250 );
		frame.setVisible( true );
	}
}
Run the code. The JComboBox appears in place of the retired JCheckBox, because it has the same name (i.e. 'retired') as Metawidget would have given the JCheckbox:
| Note |
|---|---|
| The default algorithm looks for child controls with the same name, but you can plug in your own implementation if you need to. See Section 2.4.5, “OverriddenWidgetBuilder”. |
To suppress a widget's creation entirely, simply supplying an empty JPanel named 'retired' will not work as Metawidget will still create an accompanying label in the left hand column. Instead, Metawidget includes special Stub widgets for this purpose:
package com.myapp;

import javax.swing.*;
import org.metawidget.inspector.annotation.*;
import org.metawidget.inspector.composite.*;
import org.metawidget.inspector.propertytype.*;
import org.metawidget.inspector.xml.*;
import org.metawidget.swing.*;

public class Main {

	public static void main( String[] args ) {
		Person person = new Person();

		SwingMetawidget metawidget = new SwingMetawidget();
		XmlInspectorConfig config = new XmlInspectorConfig();
		config.setInputStream( Main.class.getResourceAsStream( "metawidget-metadata.xml" ));
		CompositeInspectorConfig inspectorConfig = new CompositeInspectorConfig().setInspectors(
			new XmlInspector( config ),
			new PropertyTypeInspector(),
			new MetawidgetAnnotationInspector() );
		metawidget.setInspector( new CompositeInspector( inspectorConfig ) );
		GridBagLayoutConfig nestedLayoutConfig = new GridBagLayoutConfig().setNumberOfColumns( 2 );
		TabbedPaneLayoutDecoratorConfig layoutConfig = new TabbedPaneLayoutDecoratorConfig().setLayout(
			new org.metawidget.swing.layout.GridBagLayout( nestedLayoutConfig ));
		metawidget.setMetawidgetLayout( new TabbedPaneLayoutDecorator( layoutConfig ));
		metawidget.setToInspect( person );
		metawidget.add( new Stub( "retired" ));

		JFrame frame = new JFrame( "Metawidget Tutorial" );
		frame.setDefaultCloseOperation( JFrame.EXIT_ON_CLOSE );
		frame.getContentPane().add( metawidget );
		frame.setSize( 400, 250 );
		frame.setVisible( true );
	}
}
Run the code. The retired property and its label will not appear:

Another way is to use a @UiHidden annotation on the business class:
package com.myapp;

import org.metawidget.inspector.annotation.*;

public class Person {

	public enum Gender { Male, Female }

	private String	mName;
	private int		mAge;
	private boolean	mRetired;
	private Gender	mGender;
	private String	mNotes;
	private String	mEmployer;
	private String	mDepartment;

	public String getName() { return mName; }
	public void setName( String name ) { mName = name; }

	public int getAge() { return mAge; }
	public void setAge( int age ) { mAge = age; }

	@UiHidden
	public boolean isRetired() { return mRetired; }
	public void setRetired( boolean retired ) { mRetired = retired; }

	@UiComesAfter( "retired" )
	public Gender getGender() { return mGender; }
	public void setGender( Gender gender ) { mGender = gender; }

	@UiComesAfter( "gender" )
	@UiLarge
	public String getNotes() { return mNotes; }
	public void setNotes( String notes ) { mNotes = notes; }

	@UiComesAfter( "notes" )
	@UiSection( "Work" )
	public String getEmployer() { return mEmployer; }
	public void setEmployer( String employer ) { mEmployer = employer; }

	@UiComesAfter( "employer" )
	public String getDepartment() { return mDepartment; }
	public void setDepartment( String department ) { mDepartment = department; }
}
In both cases, org.metawidget.swing.layout.GridBagLayout is smart enough to always give large JComponents like notes the full width of the JFrame.
So far we have been instantiating our Inspectors and Layouts in Java code. Whilst this approach is possible for all Inspectors and Layouts, many UI frameworks employ visual UI builders or intermediate languages (such as JSP) that make getting to the Java code cumbersome (i.e. you have to derive custom widgets).
As an alternative, Metawidget supports external XML configuration. Create a file called metawidget.xml in the same folder as your Main class:
<metawidget xmlns="http://metawidget.org"
	xmlns:xsi="http://www.w3.org/2001/XMLSchema-instance"
	version="1.0"
	xsi:schemaLocation="http://metawidget.org http://metawidget.org/xsd/metawidget-1.0.xsd">

	<swingMetawidget xmlns="java:org.metawidget.swing">
		<inspector>
			<compositeInspector xmlns="java:org.metawidget.inspector.composite"
				config="CompositeInspectorConfig">
				<inspectors>
					<array>
						<xmlInspector xmlns="java:org.metawidget.inspector.xml" config="XmlInspectorConfig">
							<inputStream>
								<resource>com/myapp/metawidget-metadata.xml</resource>
							</inputStream>
						</xmlInspector>
						<propertyTypeInspector xmlns="java:org.metawidget.inspector.propertytype"/>
						<metawidgetAnnotationInspector xmlns="java:org.metawidget.inspector.annotation" />
					</array>
				</inspectors>
			</compositeInspector>
		</inspector>
		<metawidgetLayout>
			<tabbedPaneLayoutDecorator xmlns="java:org.metawidget.swing.layout"
				config="TabbedPaneLayoutDecoratorConfig">
				<layout>
					<gridBagLayout config="GridBagLayoutConfig">
						<numberOfColumns>
							<int>2</int>
						</numberOfColumns>
					</gridBagLayout>
				</layout>
			</tabbedPaneLayoutDecorator>
		</metawidgetLayout>
	</swingMetawidget>

</metawidget>
Now update your Main class to use this file:
package com.myapp;

import javax.swing.*;
import org.metawidget.swing.*;

public class Main {

	public static void main( String[] args ) {
		Person person = new Person();

		SwingMetawidget metawidget = new SwingMetawidget();
		metawidget.setConfig( "com/myapp/metawidget.xml" );
		metawidget.setToInspect( person );

		JFrame frame = new JFrame( "Metawidget Tutorial" );
		frame.setDefaultCloseOperation( JFrame.EXIT_ON_CLOSE );
		frame.getContentPane().add( metawidget );
		frame.setSize( 400, 250 );
		frame.setVisible( true );
	}
}
Run the code. The output is the same as before, but this time we are configuring our Metawidget via external XML.
Visual UI builders can call SwingMetawidget.setConfig from the builder, with no coding required. Other UI frameworks (e.g. JSPs, Android) have similar 'code free' approaches (e.g. setting an attribute on a JSP tag, setting an attribute in an Android layout file) to setting the XML file. We shall look at these sorts of frameworks in Part 2.
Now skip to Section 1.3, “Part 2 - The Address Book Application”